Airscan®
Non-Contact Ultrasonics
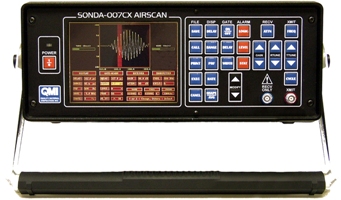
Airscan® is a Non-Contact Air-Coupled Ultrasonic Inspection technique developed by QMI in 1986. This technique differs from conventional water-immersion testing, water-jet testing and dry-coupled testing by using air as the acoustic coupling media between the transducers and the part under test.
Airscan® offers the advantage of the elimination of water contamination of the item under test, the elimination of water handling and purification systems (pumps, tanks or collection basins, filters, etc.), and the elimination of contaminated water disposal issues.
Applications
Airscan® is intended for use with engineered materials, such as:
| Laminated Materials | Core Materials |
| Aluminum Laminates | Honeycomb Core |
| CFRP Lay-ups | Foam Core |
| FRP Lay-ups | Balsa |
| Bonded Assemblies |
Airscan® vs. Water-Jet and Water-Immersion Testing
In the case of water-jet and water-immersion testing, water is the coupling media. Water coupling is acoustically more efficient than Airscan®, as it is a superior acoustic conductor as compared to air. Therefore, Airscan® requires very powerful transmitter transducers and very sensitive receiver transducers in order to overcome the acoustic losses associated with air. Beyond these differences, Airscan® and water-jet and water-immersion testing are very similar in both application and results. For instance, all these techniques are readily integrated into C-Scan Data Acquisition Systems for the raster-scanning and imaging of the item under test.
How it Works
Airscan® is a technique that monitors the degree to which an ultrasonic signal is modified by the part under inspection. As is the case with conventional ultrasonic inspection, this modification results from changes within the structure of the part. For example, one may scan honeycomb-core material for nonbonds, disbonds, crushed core, delaminations and inclusions.
For most practical applications, Airscan® is a through-transmission technique, whereby two transducers are used in the process: one transmitter (analogous to a loudspeaker) and one receiver (analogous to a microphone). The transducers are located in a fixed relationship to one another with the test piece between them. A very powerful burst of ultrasonic energy is directed by the transmitter toward one surface of the test piece. A [small] percentage of that energy will pass through the structure and radiate out the opposite side, detectable by the receiver transducer. The degree to which the energy is modified is dependent upon the internal structure of the panel. In the case of a 'good' lamination, a readily detectable signal will be available to the receiver transducer; whereas, in the case of a 'bad' lamination (non-bond, disbond, void, or inclusion) the signal will be further modified.
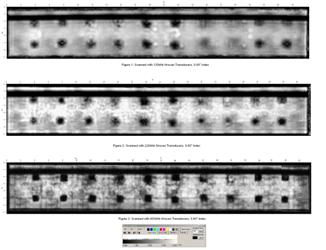
As in conventional ultrasonic TTU inspection, the choice of Airscan® transducer frequency determines the balance of penetrating power vs. lateral resolution. The scan images below illustrate the impact of transducer choice on image quality. The scanned specimen is a section of 0.900" aluminum honeycomb core with 0.015" carbon-fiber face-sheets. Each of these scans were performed at a linear scan velocity of 6ips, with an index of 0.020 inches.
Figure 1. is a scan image collected with AS120i (120kHz) Airscan® transducers, which feature a focal spot diameter of 0.160". These transducers readily penetrated the sample, yet lack sufficient resolution to clearly resolve each cell wall.
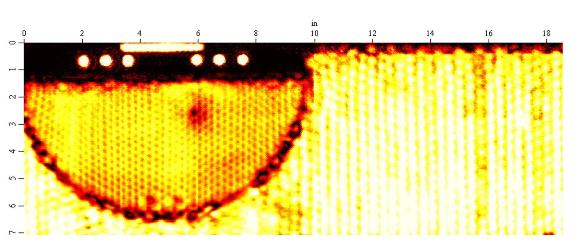
Figure 1- 120kHz Image
Figure 2. is a scan image collected with AS225i (225kHz) Airscan® transducers, which features a focal spot diameter of 0.080". These transducers also readily penetrated the sample, and clearly resolve each cell wall.
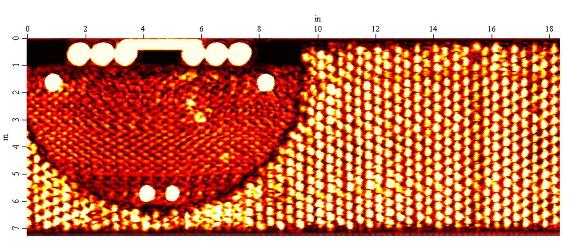
Figure 2- 225kHz Image
Figure 3. is a scan image collected with AS400i (400kHz) Airscan® transducers, which features a focal spot diameter of 0.040". These transducers also readily penetrated the sample, but reveal so much detail that interpretation may be difficult.
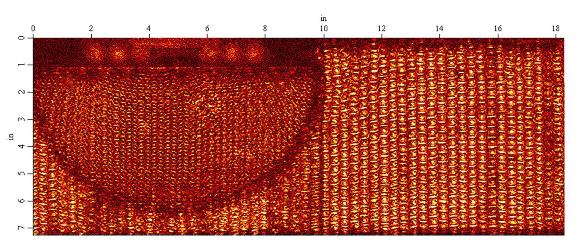
Figure 3- 400kHz Image
In the case of this specific material, the 225kHz transducers provide the optimum balance between penetrating power and resolution.
Additional materials that are well suited to Airscan® inspection include:


